Showing posts with label Lightroom. Show all posts

Wednesday, January 19, 2011

Snow Day VB Style

Mount Trashmore, the single great attribution to making garbage a recreational playground, is the highest elevation in the relatively flat Virginia Tidewater. Decades ago, with Virginia Beach growing beyond leaps and bounds, some visionaries had the masterful idea of turning the city landfill into a man made mountain (ok, hill) that would provide endless entertainment possibilities. In it's early stages, a soapbox derby track ran down the East side. It was later decommissioned as interest in the longtime Boy Scout sport diminished. The park though continued to flourish with the building of a skate park that has hosted pro events as well as daily use by local boarders, a playground with a multitude of playground equipment, a running path, and picnic grounds. The sink holes used to excavate dirt for the mountain have filled in with water providing opportunities to fish, canoe, and bird watch. It has become somewhat of an outdoor recreation oasis right inside the confines of the new Town Center.

While still recovering from foot surgery, I missed the opportunity to photograph it during the december blizzard that blanketed the area with up to 14"of snow; however, I got a second chance in early January when a small Saturday snow shower temporarily coated the area in a blanket of white before disappearing by Monday morning. It was a good example of why it pays to have your camera with you even when you aren't on a planned photo trek. We just happened to be driving by on our way to a late lunch when landfill caught my eye, resulting in this image.


From a technical standpoint, the capture was fairly simple. The equipment used was just a Nikon D300, a Sigma 28 - 70mm f2.8 lens, an Induro tripod and a Nikon remote release cable. The latter 2 pieces of equipment were critical for getting a sharp capture. With an ISO of 200, aperture of f/11, and overhead cloud cover; the shutter speed registered at 1/60 sec. I set the exposure compensation to +.1 to ensure that the white snow didn't register as gray. The tripod and shutter release minimized any shake that could have caused blur in the image, either from shooting handheld or by vibrations caused by pressing the shutter button on the camera. The entire setup, shot, and breakdown took 10-minutes.

Compositionally, I wanted to capture the mount as a backdrop to the lake. From most vantage points this was nice but boring. I walked around for a couple of minutes until I found the angle on the wooden fence where it came across the base of the photo and then provided a leading line pointing at the mountain. It gives a strong visual line for the eye to follow within the final image.

Processing consisted of some minor tweaks in Lightroom and dodging/burning in CS5. onOne Phototools was used to make the colors in the photo pop a bit more and increase the contrast.

The one recreational shortcoming of Mount Trashmore is that the City of Virginia beach no longer allows sledding. Its sad that the one place in the city that can be used for rare snow-related sports is off-limits due to safety concerns.

Wednesday, January 28, 2009

The Creation of Ariel

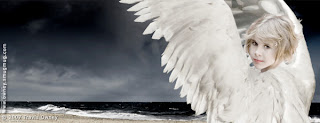
I recently received a request on DGrin for information on how I created an image of an angel. Btw, the angel is my niece Savannah and she truly is an angel! The Ariel image was created for the LPS Challenge: Sin or Virtue last year. Here is the final....


When I envisioned it originally, I planned to purchase or rent wings from a theatrical store for my niece Savannah to wear. Well I couldn't find any for rent and to purchase a set online, it was going to cost at a minimum $600, which was way more than I was willing to splurge for a contest. Next I investigated making a set of wings only to find that Michael's had 3 feathers for $5, another small fortune. I decided to take a different tact and employ some editing skills. The key was that all of the images had to be taken that weekend so I didn't have a lot of time to set up perfect shots.

Element 1: Stormy Beach
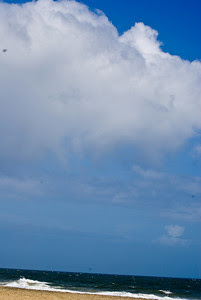
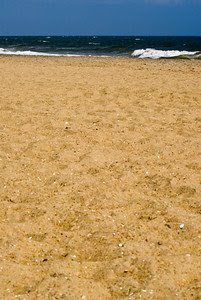
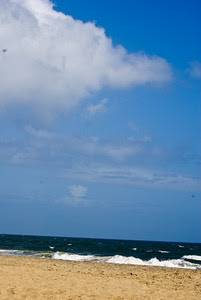
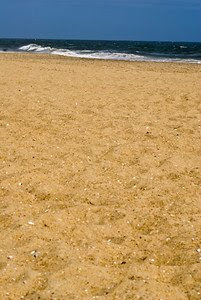
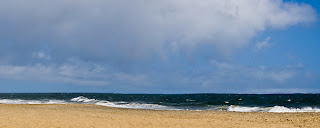
This part was going to be easy. It just so happened that their was tropical storm passing by Virginia Beach that weekend. As usual, though, it was not as easy as planned! When I got to Sandbridge Beach, I opened my bag to find that condensation had formed inside of my 18 - 200mm lens (I was using Sony at the time). The only other lens I had was a 70 - 300mm, leaving me the choice of either giving up on the landscape or set the lens to 70mm and shoot a panaroma. To get enough usable field for the depth I wanted, I set the camera in portrait orientation and took 8 frames.. 4 top and 4 bottom. Here are a few to get the idea....

Frame 1:

Frame 2:

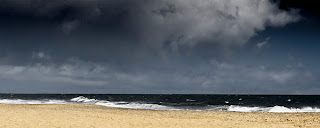
When I got home, I stitched these using PS CS3 and trimmed the panaroma into a 2:5 ratio to get the following image.
As you can see, the tropical storm was a bit of a disappointment as the the clouds never formed into the dark, nasty formations that you expect from a storm like that. To fix it, I created a black and white layer above the color base. I then added multiple curves adjustment layers and gradient masks to enhance the contrast of the sky and beach separately. The next step was to copy the original background layer to the top of the stack, set its blend mode to "Color" and then drop the opacity until I got the tone that I needed.


Element 2: The Model
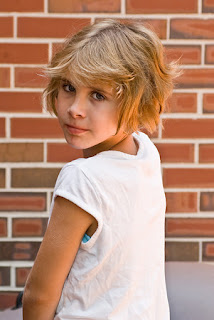
Due to time constraints, I wasn't able to take Savannah to the beach for the shot. I had to settle for getting a shot of her at her house on my way home from the beach. Now this is possibly one of the worst portraits -- I take that back -- this is not even a portrait by anyone's standards. It is a 5-second snapshot in bad light with a horrible background.


In PS CS3, I extracted Savannah from the background. It was a fairly frustrating extraction due to the mortar in the bricks matching her hair. This was probably the most pain staking part but when I was done, the patio was gone.

Element 3: Wings
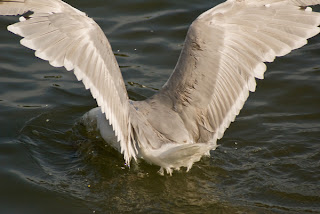
This part was fun. I grabbed my camera and headed down the local marina and hung out by the fish cleaning station for a bit. Before long, a group of fishermen showed with a nice catch and began carving away. Within seconds, there was no less than 50 seagulls hovering around picking off scraps. I must have shot 200 images and I'm not sure if this is the exact one I settled on but it was close...


Element 4: An Angel is Born
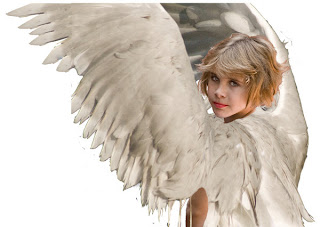
In PS CS3, I opened the image of Savannah and the seagull photo. Using the Move Tool, I dragged the wings image onto the Savannah image, creating 2 layers with the wings on top. Selecting the Wings layer, I dropped the opacity to 50% so that I could see Savannah beneath them. I selected Edit>Transform and rotated the wings so that they were pointing more vertical and moved them so that they lined up with Savannah's body. I also tweaked the image size to make the wings "fit".


Once I had the wings in the location that I wanted, the next step was to create a mask on the wings layer and begin painting out the portions of seagull and that I did not want. Paint on the mask with black to hide the unwanted elements and let the background show thru. I then raised the wings layer's opacity back to 100% and I had the rough angel image that I needed.

As you can see, the image is really rough (Also pretend that the white background is really transparent). I used the Healing Brush to smooth out the intersection of feathers to Savannah's body as well as hide her arm by adding feathers. I also cleaned up the mask a bit more to hide the extraneous stuff I missed the first time around.

The final adjustment to the Angel was to desaturate her facial color. If you recall from above, her portrait was taken with hard sunlight bounced off of a brick wall and her face picked up a lot of red. I lowered the saturation and selectively brought back color to the eyes and mouth by masking the Saturation Adjustment layer. I added some surface blur to her face as well to give her that soft powdery appearance.

The last step in the process was to drag the Angel layers into the Beach image and make some final healing and color adjustments to each element to get them to blend seamlessly while adjusting a final curves layer to add depth.

I wrote this from memory of something that I did a year ago so I probably missed a few things but I think you will get the general gist. The key is envisioning your target image and then seeing how different components can be molded to fit. On their own, each of these photos were less than good; however, bringing them together created something kind of magical. I wish I was this creative all of the time.

Wednesday, September 24, 2008

Essential Websites for the Photographer

There are a multitude of resources dedicate to photography and post processing of images. As expected, the internet contains thousands of sites dedicated to the subject. You can find websites providing all you need to know about Holga Cameras to others on infrared photography. There are a few though that I visit almost daily and highly recommend to any photographer or digital artist for the quality of their instructional content, inspiring images, and occasional freebies. For those that have been around for awhile, I’m sure that these are already in your bookmarks but if not, definitely mark them (or in the case of blogs – subscribe) for future reference. You will not be disappointed.

Digital Pro Talk
David Ziser is a very accomplished and well respected wedding and portrait photographer; however, his abilities are not limited simply to people. He seems to have mastered that art of capturing any subject. Digital Pro Talk is David’s blog and it contains an unprecedented wealth of information for the both the aspiring photographer and the advanced hobbyist. David will often follow up a written entry on specific techniques with a very thorough and well produced video on how to apply the technique. Anyone that has seen David’s bridal portraits has probably had to pick their jaw off of the ground. The great thing is that the same techniques used for bridal images can be applied to everyday portraits. For those in the business, David provides weekly valuable insights into how to operate and market a successful business. Lastly, the site also contains a wealth of links to other related sites for inspiration, equipment reviews, and post processing tutorials. This should be your first stop each day!


Iso 200, f/9.o, 1/125 sec, 32mm

Lightroom Killer Tips
Matt Kloskowski is one of the original “Photoshop Guys” from the Photoshop User TV and in addition to still doing episodes for the show and managing his Photoshop Killer Tips site; he has devoted a lot of time and effort to his Lightroom site. I am finding more and more that I am doing the majority of my post processing in Adobe Lightroom and very seldom pulling images into Adobe Photoshop unless there is something that I must truly customize. Lightroom 2.0 has made this especially true with its new adjustment tools. By relying on Lightroom for most of the processing, my workflow has sped up dramatically, a real time saver when processing hundreds of photos from an event shoot like a surfing contest. I’ve gotten to the point that I now recommend Lightroom 2.0 as a first purchase before getting Photoshop CS4. Anyway, I got off-track so more about the site. Matt provides a wealth of information, tutorials, and even downloadable presets that you can apply to your own images. Like David, he also posts regular links to inspiring sites and product recommendations. He has a casual, laid back style and regularly replies to emails and comments on his postings. Even if you do not own Lightroom yet (I’m sure you eventually will), this is a great site to visit on a regular basis.

Strobist
The Strobist blog can be described as everything that you need to know about lighting while on a budget. A few years ago, several photographers discovered that with a bit of creativeness and a good understanding of light and subject, they could create amazing images using portable hot shoe flashes that rivaled those created with high-end studio strobes. The Strobist site walks you through the courses Lighting 101 and Lighting 102, which provide easy to understand explanations on lighting gear and techniques from the beginner to the advanced user level. There is even an associated Flickr gallery where you can post your results as well as view the images created by others. In addition to the lessons, there are many informative posts on everything from advanced lighting techniques to do-it-yourself lighting equipment projects. Regardless if you have an unlimited budget and the greatest lighting gadgets, the Strobist site can still provide you with some valuable information.


Iso 200, f/11.o, 1/250 sec, 62mm

Photoshop User
Opening disclaimer is that to view the majority of content on Photoshop User, you have to join the National Association of Photoshop Professionals (NAPP). It costs approximately $100 a year but in addition to the site access, you get a subscription to Photoshop User as well as technical support and discounts to most of the major photographic equipment and software suppliers. The site contains hundreds of tutorials and videos as well as portfolios of other users. It is worth the cost to sign up. If you choose not too, though, you can still access Photoshop User TV, a weekly half-hour show lead by the likes of Scott Kelby, Dave Cross, and Matt Kloskowski in addition to several others. The shows are part tutorial, part news, and part product review. There is a little corny humor but it is all in lighthearted fun.

Well as previously mentioned, there many more sites out there, definitely some that I will feature in future posts; however if you were to check only 4 sites a day, I’d make these a priority.