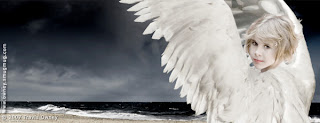
I recently received a request on DGrin for information on how I created an image of an angel. Btw, the angel is my niece Savannah and she truly is an angel! The Ariel image was created for the LPS Challenge: Sin or Virtue last year. Here is the final....
When I envisioned it originally, I planned to purchase or rent wings from a theatrical store for my niece Savannah to wear. Well I couldn't find any for rent and to purchase a set online, it was going to cost at a minimum $600, which was way more than I was willing to splurge for a contest. Next I investigated making a set of wings only to find that Michael's had 3 feathers for $5, another small fortune. I decided to take a different tact and employ some editing skills. The key was that all of the images had to be taken that weekend so I didn't have a lot of time to set up perfect shots.
Element 1: Stormy Beach
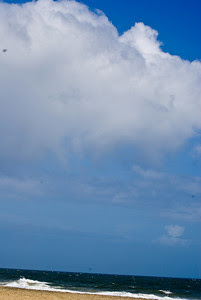
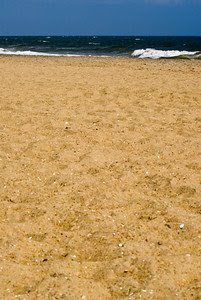
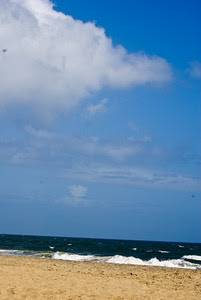
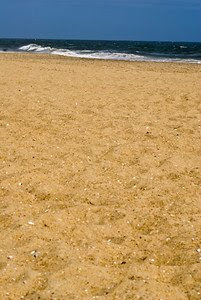
This part was going to be easy. It just so happened that their was tropical storm passing by Virginia Beach that weekend. As usual, though, it was not as easy as planned! When I got to Sandbridge Beach, I opened my bag to find that condensation had formed inside of my 18 - 200mm lens (I was using Sony at the time). The only other lens I had was a 70 - 300mm, leaving me the choice of either giving up on the landscape or set the lens to 70mm and shoot a panaroma. To get enough usable field for the depth I wanted, I set the camera in portrait orientation and took 8 frames.. 4 top and 4 bottom. Here are a few to get the idea....
Frame 1:
Frame 2:
When I got home, I stitched these using PS CS3 and trimmed the panaroma into a 2:5 ratio to get the following image.
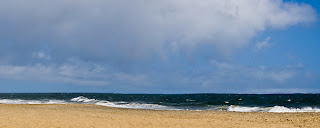
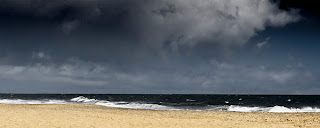
As you can see, the tropical storm was a bit of a disappointment as the the clouds never formed into the dark, nasty formations that you expect from a storm like that. To fix it, I created a black and white layer above the color base. I then added multiple curves adjustment layers and gradient masks to enhance the contrast of the sky and beach separately. The next step was to copy the original background layer to the top of the stack, set its blend mode to "Color" and then drop the opacity until I got the tone that I needed.
Element 2: The Model
Due to time constraints, I wasn't able to take Savannah to the beach for the shot. I had to settle for getting a shot of her at her house on my way home from the beach. Now this is possibly one of the worst portraits -- I take that back -- this is not even a portrait by anyone's standards. It is a 5-second snapshot in bad light with a horrible background.
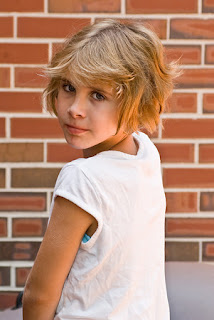
In PS CS3, I extracted Savannah from the background. It was a fairly frustrating extraction due to the mortar in the bricks matching her hair. This was probably the most pain staking part but when I was done, the patio was gone.
Element 3: Wings
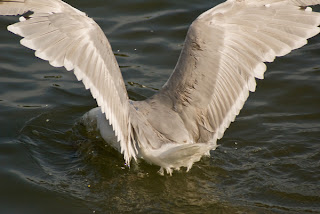
This part was fun. I grabbed my camera and headed down the local marina and hung out by the fish cleaning station for a bit. Before long, a group of fishermen showed with a nice catch and began carving away. Within seconds, there was no less than 50 seagulls hovering around picking off scraps. I must have shot 200 images and I'm not sure if this is the exact one I settled on but it was close...
Element 4: An Angel is Born
In PS CS3, I opened the image of Savannah and the seagull photo. Using the Move Tool, I dragged the wings image onto the Savannah image, creating 2 layers with the wings on top. Selecting the Wings layer, I dropped the opacity to 50% so that I could see Savannah beneath them. I selected Edit>Transform and rotated the wings so that they were pointing more vertical and moved them so that they lined up with Savannah's body. I also tweaked the image size to make the wings "fit".

Once I had the wings in the location that I wanted, the next step was to create a mask on the wings layer and begin painting out the portions of seagull and that I did not want. Paint on the mask with black to hide the unwanted elements and let the background show thru. I then raised the wings layer's opacity back to 100% and I had the rough angel image that I needed.
As you can see, the image is really rough (Also pretend that the white background is really transparent). I used the Healing Brush to smooth out the intersection of feathers to Savannah's body as well as hide her arm by adding feathers. I also cleaned up the mask a bit more to hide the extraneous stuff I missed the first time around.
The final adjustment to the Angel was to desaturate her facial color. If you recall from above, her portrait was taken with hard sunlight bounced off of a brick wall and her face picked up a lot of red. I lowered the saturation and selectively brought back color to the eyes and mouth by masking the Saturation Adjustment layer. I added some surface blur to her face as well to give her that soft powdery appearance.
The last step in the process was to drag the Angel layers into the Beach image and make some final healing and color adjustments to each element to get them to blend seamlessly while adjusting a final curves layer to add depth.
I wrote this from memory of something that I did a year ago so I probably missed a few things but I think you will get the general gist. The key is envisioning your target image and then seeing how different components can be molded to fit. On their own, each of these photos were less than good; however, bringing them together created something kind of magical. I wish I was this creative all of the time.